| * Step
1 Change your foreground color
in the yellow color of the Ara. (Click left with your dropper in the
yellow)
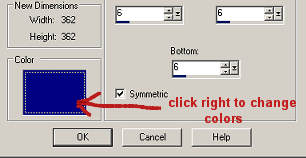
Add a 6 pixels border. (image - add border)
You will have a new window where you can change the settings to make
a border.
By clicking right you can change the border color in your fore - or
background color.

Change your background color in the blue color of the Ara. (Click
right with your dropper in the blue)
Add a 10 pixel border.
* Step 2
Click with right in your layer palette and
duplicate the background twice.
Click with right on your background layer and choose "promote
background layer"
Click on this layer again and choose "rename" and name the layer "layer
1" (enter after this)
Rename the dulicated layers on the same way in layer 2 and layer 3.
Then lock layer 1 and 2 by clicking on the eye behind the layers.
Activate layer 3 by clicking on it.
* Step 3
Click with your magic wand in the outside
blue border to select it.
Change your foreground color in the red color of the Ara.
Select your Paint Brush and use the next settings:

Click left in the selected border and you will see a red square in the
blue border.
Every time you click left there will be another red square.
Make sure you have enough space between the squares for 2 more squares
(you will add this later)
Go all around on this way. No problem if you make a mistake. With Edit -
Undo, you go back one step.
Or click CTRL+Z, it does the same as Edit - Undo.
* Step 4
Change the foreground color in the yellow
color of the Ara.
Activate layer 2 in your layer palette. Push the transparency slide of
layer 3 to 30

Layer 3 is partly transparent now, so you can see the squares while
working on layer 2.
Select your Paint Brush again.
Now place a yellow square next to every red square.
You can zoom in to see it all better.
If you think you could stay on the blue border it's possible to take the
selection away.
Go all around on this way again and make sure to keep enough space for a
third square.
* Step 5
Activate layer 1 by clicking on it.
Push also the transperency slide of layer 2 on 30.
Now you can see the red and the yellow squares.
Change the foreground color in black.
Take your Paint brush again and make black squares next to the yellow
ones.
Go all around again.
It's no problem if 2 squares overlap a bit.
When you are all done, push the transparency slides back to 100
Make sure all 3 layers are unlocked (the eye)
If your border is still selected...Select - Select none.
Go to File - Save as - Animation Shop (*PSP)
Don't forget where you saved you!
* Step 6
Go to File - Jasc Sofware
Products - Launch Animationshop.
Click on the icon under the word File
 this
is the Animation Wizard this
is the Animation Wizard
Select:
Same size (next)
Transparent (next)
Center and canvas color (next)
Yes, repeat and 18 seconds (next)
Add image and search for this tutorial
File type is Paint Shop Pro image!!
Open the saved image (next)
Finish
You will see the 3 frames with the Ara's.
By clicking here
 you can see your animation
* Step 7
File - save as Gif and select a folder or
File - Wizard Optimalisation
Check GIF and new animation (next)
In the next window the slide to the top (check nothing and next)
Next - Next - Finish
You can use any picture you want for
this tutorial.
And you can also use a different shape from your Paint Brush.
You call this "Blinkies"
|